I write science fiction, draw, paint, photobash, do woodworking, and dabble in 2d videogames design. Big fan of reducing waste, and of building community

https://jacobcoffinwrites.wordpress.com

@jacobcoffin@writing.exchange

  • 16 Posts
  • 17 Comments
Joined 1 year ago
cake
Cake day: June 5th, 2023

help-circle


  • I’m just getting into bookbinding. It requires surprisingly few tools and not a ton of space (though like all hobbies it can always grow to consume whatever space is available). Its a good option if you have access to a printer with free or cheap prints.

    Balcony gardening can be satisfying but might not be what you’re looking for.

    If you already have a project (or lots of them) in mind, a 3d printer can be great to have around. Depending on your fillaments of choice (determined by what you want the print to be able to do) you might need good ventilation or an enclosure. If you have a spare bedroom that’s a good start.


  • Make things and fix things. I already do a lot of projects in my free time - I write science fiction, I paint, I photobash art, I do woodworking, furniture restoration, metalworking, repair ewaste to give away, and grow plants. I’d just do a lot more of all that with a bit less life stress around work. If that’s not enough, I’ve been looking at volunteering with the recycling center, and I’d love to go for more hikes with family (currently I only get out on weekends and that’s unfortunately rare, especially with everyone’s conflicting schedules and levels of energy).


  • Tools! With the exception of a few big power tools like a table saw or miter saw, where the new safety features make it worthwhile, I get everything I can used. I prefer stuff passed down from family with sentimental value, but I get a lot of my tools from Everything is Free, junk stores, yard sales, estate clean outs, swap shops etc.

    Older tools tend to be simpler, easier to fix, and remarkably sturdy. I’ve read that the metallurgy wasn’t as good sixty+ years ago so they overbuilt them a bit to compensate, and then decades of use weaned out the weaker ones, so anything left still working is basically survivorship-bias guaranteed. I’ve got a drill press that’s been in the family for four generations and will probably outlast my grandkids.

    They’re cheaper, sturdier, easier to fix, generally well-documented online (sometimes better than the new stuff), and they don’t come with sheaves of unnecessary styrofoam and plastic packaging. And they have history and stories in them, even if I don’t always know what those stories are.


  • One more resource you might want to check is your local Buy Nothing or Everything is Free page. Half the houses in my current town were built before the depression by a small handful of contractors, and all of them use the same weird nonstandard doors. Whenever someone remodels people try to get the old doors because they’re as good as gold around here. Point is, if you ask around on there, you may find that someone has a stack of wooden doors you can have for free just taking up space in a garage or shed. And if they do, and you want advice on refinishing them, 100% hit me up


  • 100% use solid doors - I’ve never tried to cut a hollow color veneer door, but I broke one once and I have a hard time picturing it doing anything other than splintering when the skillsaw’s blade hits it. Best case, if the cut goes through fine, I’d still want to cut a strip of wood to glue into the now-open end of the door for structural integrity.

    If you go with solid doors, ideally actual wood, it should be as simple as cutting any other wood sheet. If the doors are plain, I’d cut the full amount from the bottom, if they have panels, windows, or other landmarks, you might want to remove material from the top and bottom so it doesn’t look disproportionate.

    (I’d start with the longer door -absolute worst case, you can cut it down to use for the smaller doorway)

    I’d get some stain that matches the color of the door, and make sure I have some sandpaper/sanding disks too.

    Measure from the top, mark the line, measure it again, stand it up by the doorway and check it’ll fit and have enough clearance to move freely. Use a skillsaw to cut it to length (err on the side of too long - you can always remove more later), check the fit, if the cut is wavy, sand down any high points. Use the sandpaper to remove any splintery bits, and use the wood stain to color the fresh cut wood and any scratches/damage near the edge. If it ends up too short you can always cut a strip of wood, stain it to match, and screw it to the shortened end (predrill your holes to reduce the chance you split the wood). Or add a strip to the doorway.

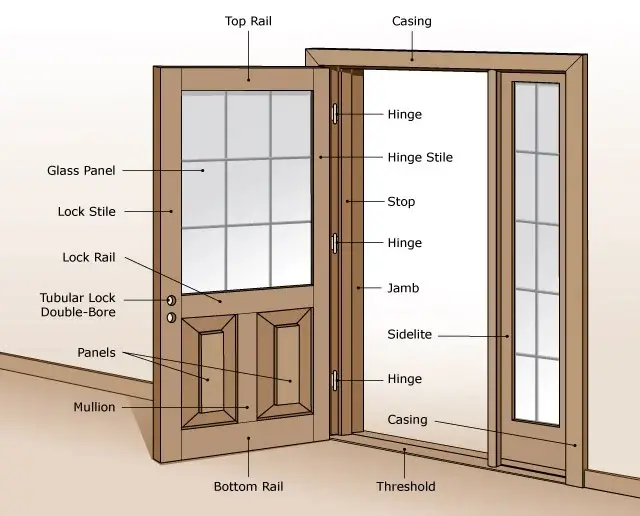
    For hanging the doors, I have a few questions: have your builders already put up full door frames, like with casings and jams?

    If so, you could take those off and see if there’s any additional space to work with (and check how square and level everything is).

    I’ve hung doors but just old seconhand ones in a camp, and ones we made on a workshop and shed. We usually attached the hinges to the door, set it down on a wood shim so it sat where it was supposed to once it was mounted, checked it was level and plum, then marked the hinge side jam, cut space for the hinges, and attached it to the frame. For what it’s worth there’s much better advice for this part online.

    The good news is that these doors aren’t terribly high-stakes. They’re interior doors, so you’re probably not worried about weatherproofing, or making them form a good seal when they’re closed or about water or anything like that. You just need them to work and not bother you. I didn’t ask about your overall comfort with diy tasks, but I think this is fairly approachable with a couple YouTube tutorials and the right tools.

    My last bit of advice is on making sure the door is real wood rather than particleboard with wood veneer. Wood doors will show endgrain somewhere, usually top and bottom, even if it’s made from different sections and panels. If every side is similar grain and there’s a bit of a seam at the edges, I can’t vouch for what’s actually inside the door.


  • Sorry I’m seeing this so late, if you’re still looking for suggestions, I might be able to help. I’m not a professional carpenter but I used to help relatives who were on small job sites and I build stuff for myself fairly often. If the walls they built are just partitions, not load bearing, then changing the frames should be doable, how easily depends a bit on how the walls are made.

    Usually we’d build a frame out of 2"x4"s, rough in the doorways, then clad the walls with sheetrock or shiplap or something, then box in the correct final dimensions of the door frame with 1"x4" boards or trim.

    Changing the doorway to make it standard might mean disassembling the doorframe and some of the surrounding wall to get at the framing underneath. If it’s wood panels or similar that can be pried up and put back, that might be a quick job. If it’s sheetrock, fixing it might be more work.

    Cutting the doors will be easier, but sort of locks you in on the nonstandard door sizes. If you’re anticipating changing them again that might not be worth it, otherwise I’d probably just cut the doors.